If you’ve ever been in a meeting debating button colors or wondering whether a wittier headline would actually lift conversions, this Webflow A/B testing guide is for you.
Webflow AB testing (also called split testing) turns guesswork into measurable wins: you show different versions of a page to separate groups, track a clear goal, and use the data to pick what actually converts.
As a copywriter who’s seen more A/B test results than I’ve had hot dinners, I can tell you this: guessing is expensive, testing is a goldmine.
In this guide you’ll learn practical, Webflow-specific workflows for A/B testing in Webflow, the best Webflow AB testing tools, how to form strong hypotheses, and how to read results so you can raise conversions without wasting time. Read on to stop guessing and start optimizing.
What Is A/B Testing and Why Does It Matter?
At its core, A/B testing is a simple comparison. You take your current webpage (Version A, the "control") and create a new version with a specific change (Version B, the "variant").
You then split your website traffic between the two. Half see the original, half see the new one. By tracking a specific goal, like clicks or sign-ups, you can definitively see which version performs better.
If you’re new to Webflow or want a deeper understanding of the platform, check out our What is Webflow – Complete Guide to get up to speed before diving into A/B testing.
For marketing directors and brand managers using Webflow, this process is essential for a few big reasons:
- It Replaces Opinions with Data: You might think a clean, minimalist homepage is the way to go. Your designer might agree. But what if your audience, the people who actually buy from you, secretly crave more detail and social proof?
Testing settles these debates. We once tested a simple headline change that a client was hesitant about; it led to a 21% increase in demo requests. Data doesn't lie. - It Drives Real Conversion Growth: You don't need a massive website overhaul to get more leads or sales. Small, informed tweaks to your calls-to-action (CTAs), forms, or value propositions can lead to huge gains over time. An extra 10% on your main conversion point each quarter adds up to serious revenue.
- It Creates a Better User Experience: A/B testing helps you find and fix the friction points that frustrate your visitors. Is your navigation confusing? Is your value proposition unclear? Testing different layouts or copy helps you create a smoother journey, which reduces bounce rates and keeps people engaged.
- It Reduces the Risk of Big Changes: Launching a brand new page design without testing is a gamble. What if it tanks your conversion rate? A/B testing lets you validate your big ideas on a small slice of your audience first. If the new design is a dud, only a portion of your traffic sees it, saving you from a costly mistake.
How Do You Set Up Your First A/B Test in Webflow?
Jumping straight into a testing tool without a plan is a recipe for confusing results and wasted time. A structured approach is what separates the pros from the amateurs. Here’s how we get it right every time.
What Are the Key Objectives and KPIs for A/B Testing in Webflow?
First, what are you trying to accomplish? A vague goal like "improve the homepage" won't get you far. You need something specific and measurable. A better goal would be, "Increase form submissions on our contact page by 15%."
Once you have your objective, you need to identify the Key Performance Indicators (KPIs) that will measure your success.
Your primary KPI should directly track your goal.
Common primary KPIs for A/B testing include:
- Conversion Rate: The percentage of visitors who complete a desired action (e.g., form submissions, purchases).
- Click-Through Rate (CTR): The percentage of visitors who click on a specific button or link.
- Lead Generation: The total number of qualified leads captured.
- Average Order Value (AOV): The average amount spent per order.
It’s also smart to watch secondary KPIs. These give you a fuller picture of user behavior.
For example, did your variant increase CTR but also cause the bounce rate to go up? That’s an important trade-off to consider.
Secondary KPIs might include:
- Time on page
- Engagement rate
- Scroll depth
- Pages per session
How Do You Create a Strong Hypothesis for Webflow A/B Testing?
A hypothesis isn’t just a guess, it's a predictive statement that explains what you're changing, what you expect to happen, and why. It forces you to think critically about the user psychology behind your test.
Here’s a simple but effective template:
"If we change [the variable], then [the expected outcome] will occur, because [the reasoning]."
Let’s put it into practice: "If we change the hero button text from 'Sign Up' to 'Start Your 14-Day Free Trial,' we will increase clicks by 20% because the new copy is more specific and directly states the value of clicking."
This hypothesis is clear, measurable, and provides a logical rationale. It’s a testable proposition, not just a random idea.
Why Should You Test Only One Variable at a Time in Webflow A/B Testing?
This is the golden rule of A/B testing: test only one element at a time. If you change the headline, the main image, and the button color all at once, you’ll have no idea which change was responsible for the results.
You might get a win, but you won't learn anything to apply to future tests.
Start with high-impact elements on high-traffic pages. A small improvement on your homepage or pricing page will deliver a much bigger return than a massive win on a page that gets 100 visitors a month.
Common elements to test include:
- Headlines and Subheadings: Test different value propositions, tones, or lengths.
- CTA Text, Color, and Placement: "Get Started" vs. "Request a Demo." Green vs. orange. Above the fold vs. at the bottom of the page.
- Images and Videos: Does a video of your product in action convert better than a static photo? Does an image of a person build more trust than a graphic?
- Form Length and Layout: Test removing non-essential fields, using a multi-step form, or changing field labels.
- Social Proof: Try different testimonials, customer logos, or case study placements.
- Page Layouts: Test a single-column vs. a two-column layout.

What Are the Best A/B Testing Tools for Webflow?
Webflow makes designing beautiful websites easy, but it doesn’t include built-in A/B testing. To run effective tests, you’ll need a third-party tool.
The right tool depends on your goals, budget, and team setup:
- For quick, lightweight tests: Tools like Optibase or Webflow Optimize integrate directly with Webflow and let you launch experiments in minutes.
- For detailed analytics and CRO insights: Platforms like VWO, AB Tasty, or Crazy Egg give you heatmaps, session recordings, and advanced reporting.
- For budget-conscious teams: GA4 can track experiments if you’re comfortable with a bit of setup.
Pick the tool that matches your workflow and testing ambition - whether that’s running simple headline tests or full conversion optimization programs.
What Is Webflow Optimize and How Does It Work for A/B Testing?
As Webflow's native solution, Webflow Optimize is an obvious first stop.
It is Webflow’s built-in A/B testing tool.
It lets you create two or more versions of a page inside Webflow and automatically split your traffic between them.

How it works:
- You create Variant A and Variant B inside Webflow (for example, different headlines, layouts, or CTAs).
- Webflow automatically shows each variant to different visitors.
- You set a goal, like “form submission” or “button click.”
- Webflow tracks which variant gets more goal completions.
- Once enough data comes in, you can declare a winner and publish it permanently.
How Does Optibase Simplify A/B Testing for Webflow Users?
Optibase is a third-party A/B testing tool made specifically for Webflow users. It makes testing fast and easy without leaving the Webflow Designer.
You can set up tests and define goals directly from the Webflow Designer using custom attributes.
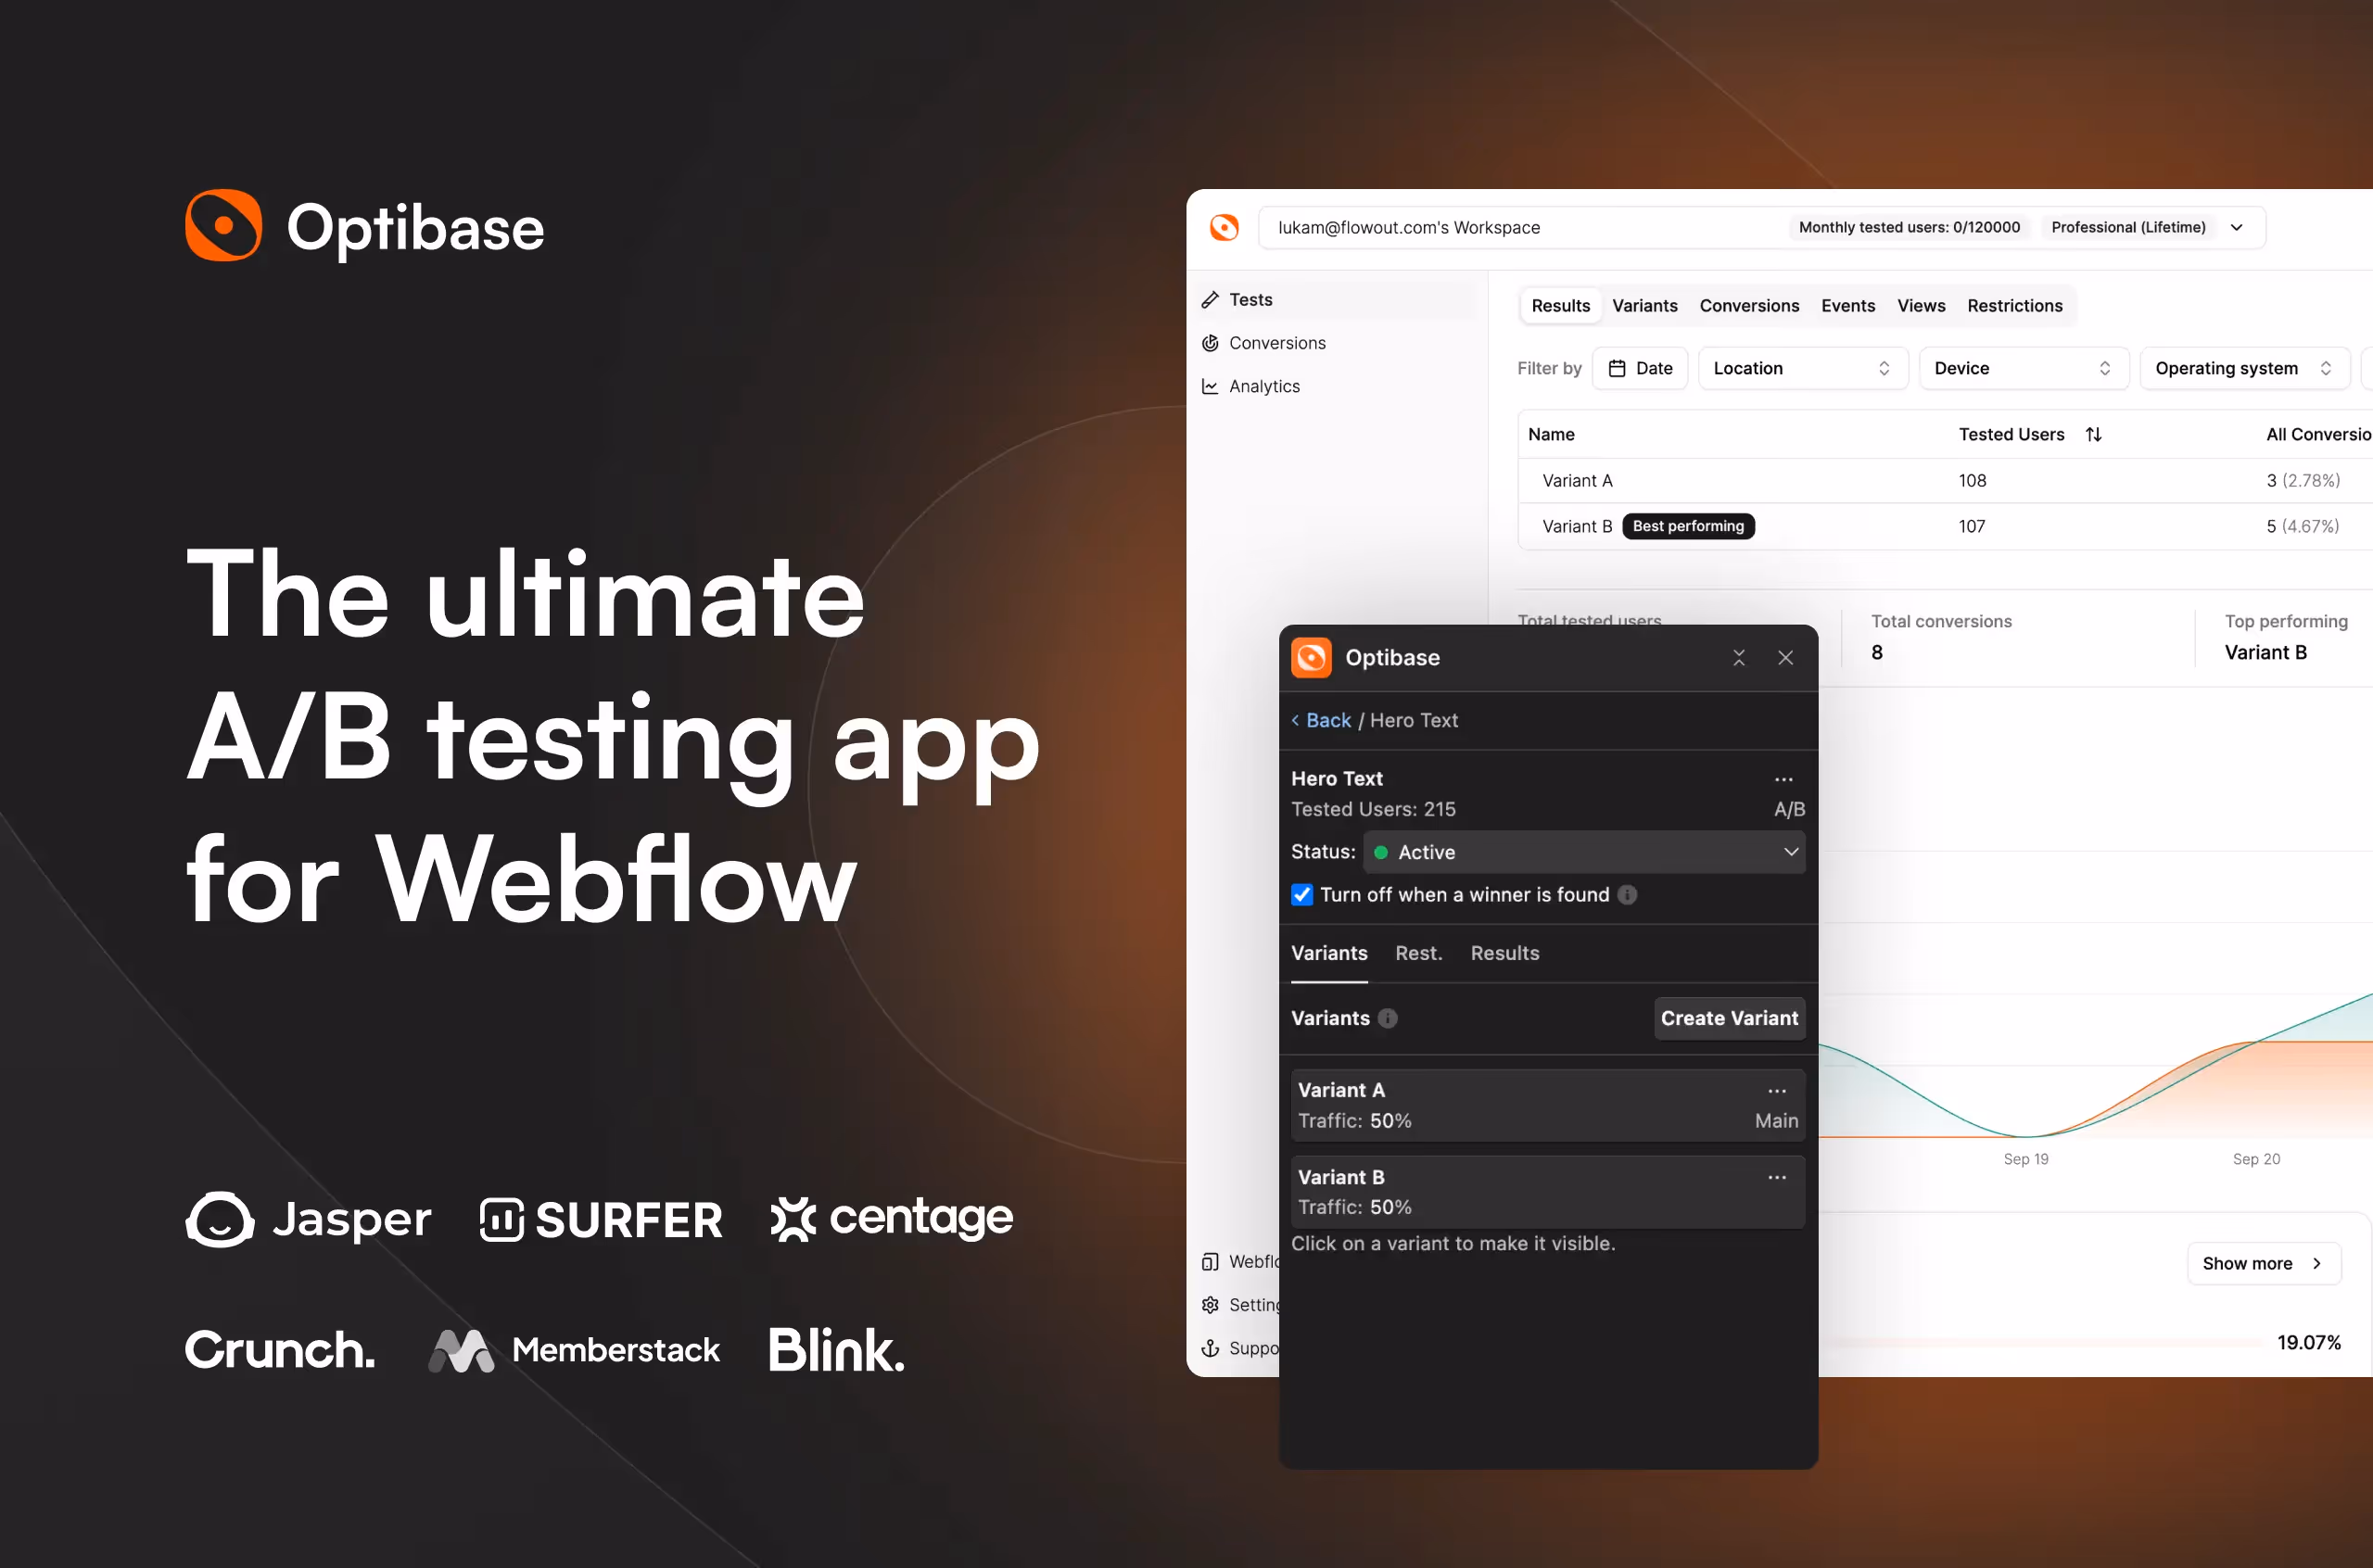
How it works:
- You create different page versions or elements in Webflow.
- Using Optibase, you assign each version a custom attribute to tell the tool which one is which.
- Set your goal, like clicks, form submissions, or purchases.
- Optibase automatically splits traffic between the variants and tracks which performs better.
- After enough data is collected, you can see the winner and make it permanent.
Can You Use Google Analytics 4 (GA4) for A/B Testing in Webflow?
Yes, you can use GA4 for A/B testing in Webflow, but it takes a bit more setup.
Unlike Webflow Optimize, GA4 doesn’t split traffic automatically - you’ll need a tool or a small custom script to send some visitors to Variant A and others to Variant B.
How it works (simple):
- Create your page variants in Webflow.
- Use a script or testing tool to send visitors to the different versions.
- In GA4, define conversion events (like form submissions or button clicks) for each variant.
- Compare the performance of Variant A vs. Variant B using GA4 reports.
GA4 gives you full control over tracking and reporting, and it’s free - great if you’re comfortable with a bit of technical setup.
What Makes Visual Website Optimizer (VWO) a Powerful A/B Testing Tool for Webflow?
VWO is a full-featured A/B testing and conversion optimization platform. It’s more than just split testing - it helps you understand why visitors behave the way they do.
How it works (simple):
- You can run A/B tests, multivariate tests, or split URL tests to compare different designs or elements.
- Use heatmaps and session recordings to see exactly how visitors interact with your pages.
- The visual editor lets you make changes directly on your Webflow site - no coding needed.
- VWO collects both quantitative data (like clicks and conversions) and qualitative insights (like user behavior patterns) to guide future tests.
VWO is ideal for teams that want detailed data plus insights into user behavior, making smarter A/B testing decisions faster.
What Are Other Powerful A/B Testing Tools for Webflow?
- AB Tasty: An enterprise-level platform that shines with its personalization features and funnel testing. It allows you to test a series of changes across a multi-page journey, like an entire checkout or onboarding flow.
- Crazy Egg: Famous for its heatmaps, Crazy Egg also offers solid A/B testing features. Its real strength is in helping you generate hypotheses by showing you where users are clicking, scrolling, and getting stuck.
- Adobe Target: A powerhouse tool for large organizations already invested in the Adobe Marketing Cloud. It offers advanced AI-powered personalization and is built for complex, large-scale optimization programs.
How Do You Conduct an A/B Test in Webflow Step by Step?
Once you have your tool selected, it’s time to get the experiment running. The exact steps vary by tool, but the core process is always the same.
- Create Your Variant in Webflow: The simplest method is to duplicate your page. In your Webflow project, go to the page settings, click "Duplicate Page," and give it a clear name (e.g., "Pricing Page - New Layout").
On this duplicated page, make the single change you defined in your hypothesis. Publish both the original and the new variant. - Configure the Test in Your Tool: Go to your A/B testing tool and set up a new experiment. You'll provide the URL for the control (Version A) and the variant (Version B). Set your traffic split - 50/50 is standard.
The tool will give you a small JavaScript snippet to add to the custom code section in your Webflow site settings. This script handles the traffic redirection automatically. - Define Your Conversion Goals: A test without goals is just traffic-splitting for fun. In your tool, define what a "conversion" means for this experiment. This could be reaching a "thank you" page after a form submission or clicking a specific button. Make sure this goal directly tracks your primary KPI.
- Run the Test and Be Patient: Launch the experiment and resist the urge to check the results every hour. Ending a test early because one version is slightly ahead is a classic blunder that leads to false conclusions. Let the test run for at least one to two full weeks to average out daily fluctuations in traffic behavior and gather enough data.
How to Run A/B Tests in Webflow Without Hurting SEO?
From an SEO perspective, here’s what you do to avoid problems:
- Canonical tag: On the variant page, add a rel="canonical" tag pointing to the original page. This tells Google: “The original is the main page.”
- Noindex tag (optional but safer): You can also add noindex to the variant page so Google won’t index it at all.
- Keep content visible to users: Don’t show different content only to Google - that’s called cloaking and can hurt SEO.
Cloaking often involves things like:
- Hiding lots of keywords or text on the page that users don’t see, but Google does.
- Showing different headlines, content, or links to Google than what real visitors see.
- Redirecting users to one page while showing Google another.
All of these are considered manipulative and can negatively impact ranking.
If you want to make sure your Webflow site is fully optimized for search while running tests, our Webflow SEO services can help you maximize visibility and conversions.
How Do You Analyze A/B Test Results and Take Action?
After the test concludes, the real work begins. The goal isn't just to find a winner, but to understand why it won so you can build on that knowledge.
Why Is Statistical Significance Important in Webflow A/B Testing?
Your testing tool will calculate statistical significance for you, usually expressed as a confidence level. The industry standard is 95% or higher.
This number tells you how likely it is that the results are due to your change and not just random chance.
If your confidence level is below 95%, you can't confidently declare a winner. The result is inconclusive. This might mean your sample size was too small or your change just didn't have much of an impact.
How Do You Interpret A/B Test Data Holistically?
First, look at your primary KPI. Did the variant win? By how much? Then, examine your secondary metrics.
Did the winning version also improve time on page, or did it hurt it? Understanding the full picture is crucial.
A win on clicks that also doubles your bounce rate might not be a win at all.
If your tool offers them, dive into heatmaps and session recordings. These qualitative insights can show you exactly how users interacted with each version, providing clues for your next test.
What Should You Do After Identifying the Winning Variant in A/B Testing?
Once you have a clear, statistically significant winner that moves your business goals in the right direction, it's time to make it permanent. In your testing tool, direct 100% of traffic to the winning URL.
Then, in Webflow, you can either unpublish the losing variant or update your original page with the winning design.
But optimization is a marathon, not a sprint. Every test, whether it's a win, a loss, or a draw, is a learning opportunity. Use the insights to form your next hypothesis and add it to your testing backlog.
How Can You Build a Culture of Optimization with A/B Testing in Webflow?
A/B testing is one of the most powerful things you can do to improve your Webflow site's performance.
By shifting from opinions to data, you can create better experiences for your users and achieve your business objectives more effectively.
Start with one simple, high-impact test. Learn from the results, whether they are good or bad. Then do it again.
The most successful brands have a relentless curiosity and a culture of continuous testing. The data is out there, waiting to tell you what to do next.

Ready to Turn Data Into Design Wins?
Running A/B tests is the difference between hoping for conversions and actually engineering them. But to test effectively, you need a Webflow site built with expert Webflow development - flexible, clean, and fast.
That is exactly what we do at Creative Corner. We combine pixel-perfect design with technical rigor, giving you a platform that isn't just a pretty face but a revenue-generating machine.
You handle the strategy, and we will handle the build that makes it all possible.